CORS & SOP – Security acronyms explained
This article is part of a series on security acronyms every Django developer should know.
In the good old times of web development, websites were pretty self-contained. You had an HTML page with a CSS stylesheet, some images, maybe a bit of Javascript, all served from the same server (e.g. example.com). Maybe your static files were served from a different host (e.g. static.example.com), so the page would include them and present them to the user.
But there was no reason why a script on a website would have a legitimate reason to access contents from another host. A script can add a script tag that loads a script from another host, but it can’t access the contents of that script.
SOP
The reason a script can’t access content loaded from another host is the Single-Origin Policy or short SOP. Under this policy, a script can only access content that has the same origin. My article on cross-site scripting explains why this usually a good idea.
Contents are considered to be of the same origin if the protocol, host, and port or their URL match.
Only the first of these requests is allowed under the same origin policy.
http://example.com/script.js -> http://example.com/api/ ✅
http://example.com/script.js -> http://example.org/api/ ⛔
http://example.com/script.js -> http://api.example.org/ ⛔
http://example.com/script.js -> http://example.com:8000/api/ ⛔
http://example.com/script.js -> https://example.com/api/ ⛔
When the SOP is in the way
The SOP is a central pillar of web security. But sometimes, it gets in the way. Let’s say you are building a fancy single-page app on example.com and it needs access to an API running on api.example.com. Or maybe you want to offer a public API which can be accessed from anyone. Under the Same-Origin Policy, both of these scenarios are not possible without workarounds.
JSONP to the rescue
One way to circumvent the SOP is a technique called JSONP. The consumer of the API inserts a script tag targeting the API endpoint.
<script src="http://api.example.com/foo/?function=callback"></script>
The API returns JSON data wrapped in a callback function, like this:
callback({"foo": "bar"})
When this script gets loaded, it calls the callback function, passing the data provided by the API.
JSONP has several drawbacks like only working with GET requests and also creates a bunch of a bunch of security concerns. JSONP sounds like a standard, but it really is more of a hack to allow cross-origin requests.
Cross-origin resource sharing done right
Modern browsers support a standardized way to enable cross-origin requests: Cross-origin resource sharing, or short CORS.
CORS requires the client-side code, the browser, and the server to work together. The client-side code has to explicitly initiate a Cross-Origin request and the browser has to ask the server if it is allowed. So unlike JSONP, CORS has to be supported by the browser, but as of 2017, all state-of-the-art browsers do.
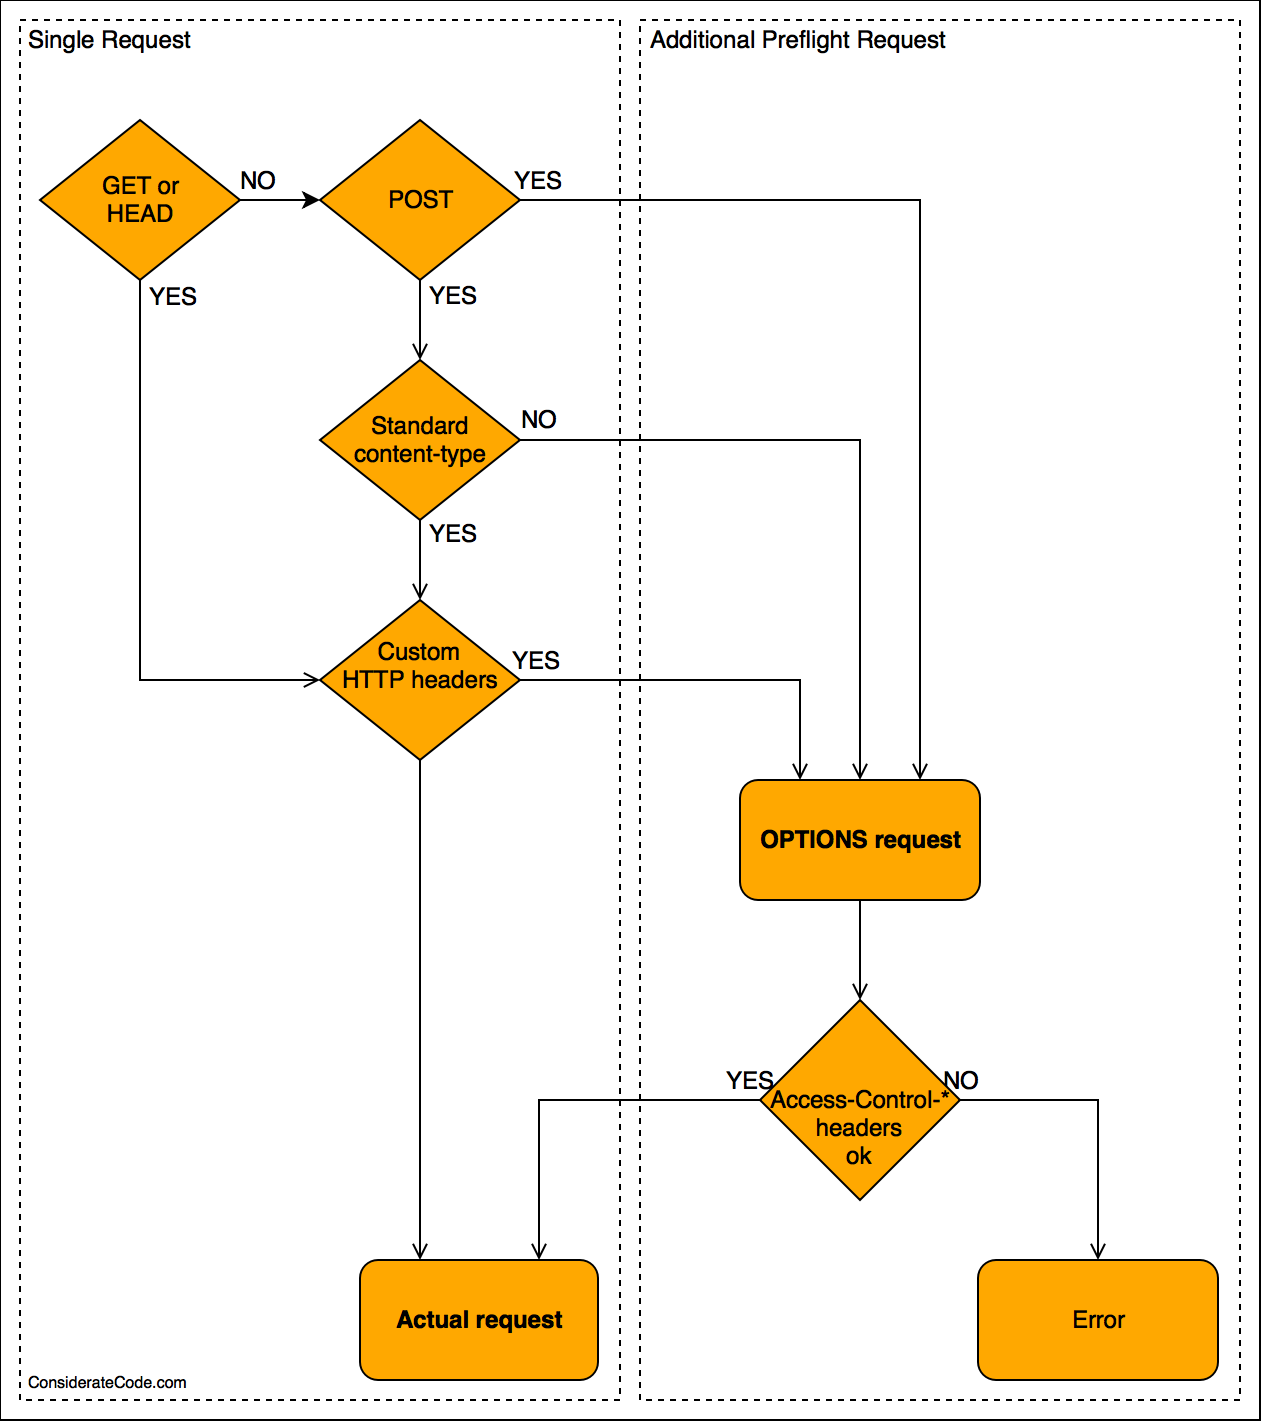
When a CORS request is executed, the browser decides if the request is performed directly or if it first has to request permission from the server by performing a so-called preflight request with the HTTP method OPTIONS.
A preflight request is not necessary if the request
- is a
GETorHEADrequest using standard headers - is a
POSTrequest using a standard content-type and standard headers
Here is a flowchart illustrating the decision if a preflight request is necessary:

This flowchart might look confusing, but the reasoning behind it is actually quite simple: if the request could not be done with an HTML form, it requires a pre-flight request.
The good news is that it’s the browsers job to decide if a pre-flight request is necessary and what Access-Control-* headers have to be set.
If you want to dive into the details how to actually perform a CORS request on the client side, I would like to refer you to the great CORS tutorial by HTML5Rocks
I want to focus on how a CORS request is handled on the server side.
There are a bunch of HTTP headers set by the client:
OriginAccess-Control-Request-MethodAccess-Control-Request-Header
The origin of the page making the request
the HTTP method of the request the page wants to make
non-standard headers the page wants to set
And also headers set by the server:
Access-Control-Allow-MethodsAccess-Control-Allow-HeadersAccess-Control-Max-AgeAccess-Control-Allow-OriginAccess-Control-Allow-CredentialsAccess-Control-Expose-Headers
HTTP methods the server allows
Non-standard headers the server allows
How long the browser should cache this information
Origins the server allows to make requests
If the browser should send credentials with the request (Cookies, HTTP Basic auth)
Which response headers the page making the request should have access to
Access-Control-Allow-Methods, Access-Control-Allow-Headers, Access-Control-Max-Age are only set when responding to preflight requests, and Access-Control-Expose-Headers is only set on responses to actual requests. Access-Control-Allow-Origin and Access-Control-Allow-Credentials are set on responses for both kind of requests.
If a request does not have an Origin header, it is not a CORS request.
If the HTTP method is OPTIONS and the request has an Access-Control-Request-Method header, it is a CORS preflight request.
Here is some flow-chart that illustrates the server-side logic to handle a CORS request:

Enabling CORS in your web application
Enabling CORS essentially means validating Origin and Access-Control-Request-* headers in requests and setting the appropriate Access-Control-* headers in responses.
You can either configure your web server (e.g. Nginx or Apache) to return these headers or implement it in your web application.
Letting the web server handle CORS requests has the advantage that preflight requests and invalid CORS requests never hit your application and are processed quickly.
In some scenarios, handling CORS requests in the web server might not be possible because you can’t configure the web server, e.g. when deploying to a PaaS provider like Heroku. Or you just want to keep your web server configuration really simple and are more comfortable writing application code.
Handling CORS requests in a web application is not trivial. As the flowchart above clearly shows, there a few things you have to get right. When you are using Django, the package django-cors-headers does the heavy lifting for you.
With django-cors-headers, you just have to configure a few settings and CORS requests are handled correctly. It is quite extensible, so most use-cases should be covered. If you have complex requirements that can’t be met with django-cors-headers, you can use corsheaders.middleware.CorsMiddleware as a starting point for your own implementation.
CORS security checklist
Enabling CORS increases the attack surface of your web application: it allows requests that are not possible without CORS. To not accidentally create any security vulnerabilities, make sure your CORS configuration is not too permissive and only allows requests that should be allowed.
Here is a checklist for setting up CORS:
- Only set
Access-Control-Max-Ageonce you are 100% sure your CORS configuration is correct. - Only allow requests from origins you really want to allow. DO NOT just add the header
Access-Control-Allow-Origin: *without thinking! - Only allow methods your application really needs. A read-only API should only allow GET requests.
- Only allow headers you really need.
- Only expose headers your application really needs.
- Only allow sending of credentials when necessary. Make sure you have proper CSRF protection in place.
Summary
I hope this article gave you an idea how CORS works, what purpose it serves and which security implications it has. There are a bunch of links below which lead to more in-depth explanations.
The next article in this series on security acronyms every Django developer should know will discuss HTTP and HSTS.